
Installing the HCL Connections Component Pack 6.5 CR1 – Part 4: Prepare the application environment
If you followed the steps from the previous parts, you have a working Kubernetes cluster and a Docker registry containing all images necessary for installing the Component Pack. In this part I’ll discuss installing all helm charts up to, but not including, the actual components like OrientMe, Elasticsearch etc. The HCL documentation on these parts is actually quite decent, so check out their documentation for specifics. It’s still handy to read through my info below though for the caveats as they did miss some parts, but make sure you also read the HCL documentation as your environment might differ from mine.
Creating the namespace
Kubernetes uses namespaces to separate pods belonging to one application from pods of another application. The helm charts for the component pack assume that you install everything in the namespace “connections”. You can choose another name if you must, but it will mean extra typing and paying close attention to the HCl documentation. To create the namespace, type:
kubectl create namespace connectionsFrom this point onwards, you’re going to need ‘kubectl -n connections’ a lot, so a handy tip is create an alias for that (thanks Martin Schmidt for the idea):
vi ~/.bashrcand add:
alias kctl='kubectl -n connections'Logout and log back in your session to make the alias active. By sheer laziness I’m going to assume that you used this tip and will use kctl instead of kubectl -n connections in the remainder of this manual.
Adding the Docker login credentials
In the previous part I created a Docker registry with the Component pack images and added a username/password for this registry. To use this registry, we want to add this username/password to a Kubernetes secret:
kctl create secret docker-registry myregkey --docker-server=<yourserver.example.com>:5000 --docker-username=admin --docker-password=<your-registry-password>Setting up the Persistent Volumes
Though the focus in the HCL documentation is on using an NFS share for the persistent volumes, the documentation suggests that you don’t *have* to use an NFS share. You can use StorageClass for the persistent volumes and add statements like –set mongodb.volumeClaimTemplates.storageClass=storageClassName to the Helm commands. If this doesn’t look familiar to you, it’s probably better to stick to the NFS storage, as HCL doesn’t give any information on how to set this up and the Kubernetes documentation on this point is not easy to interpret either. If your company already has a large Kubernetes cluster with StorageClass storage or you use a Kubernetes cluster on a cloud instance, then this might be relevant to you. Otherwise, stick to the NFS storage.
The NFS share is a small chapter in the HCL documentation, but this is one of the more tricky subjects. If you can build your own NFS server, you’re fine as you can use the provided script. If you want to use an existing storage solution (NetApp, Isilon) you have a challenge. The only prerequisite HCL described in their documentation is that NFSv4 is used. When you look at the script to setup an NFS server, it suggests that ‘no_root_squash’ is also required, which might be a problem for some security departments. This combination itself is not enough though as my experience with an Isilon at a customer showed. The problems I ran into were with MongoDB, which gave me errors like:
If you setup your own NFS server, you can use these commands on the NFS server:
yum install -y nfs-utils, rpcbind, nfs-server, nfs-lock and nfs-idmap
sudo mkdir -p /pv-connections/esdata-{0,1,2}
sudo mkdir -p /pv-connections/esbackup
sudo mkdir -p /pv-connections/customizations
sudo mkdir -p /pv-connections/mongo-node-{0,1,2}/data/db
sudo mkdir -p /pv-connections/solr-data-solr-{0,1,2}
sudo mkdir -p /pv-connections/zookeeper-data-zookeeper-{0,1,2}
sudo mkdir -p /pv-connections/kudos-boards-minio
sudo chmod -R 700 /pv-connections
sudo chmod -R 005 /pv-connections/customizations
echo "/pv-connections/kudos-boards-minio" >> <path-to>/microservices_connections/hybridcloud/support/volumes.txt
HCL missed the parts about the Kudos-boards-minio share (needed for Activities Plus), both in their documentation and in their volumes.txt, so watch out for that. If you want to use different directories than the listed ones, you have to change them in above mkdir statements and in the volumes.txt. You also have to list the right path in the helm charts and the boards-cp.yaml for Activities Plus. If you only have a path in front of /pv-connections I suggest you add an extra line in the /etc/exports with just this path including pv-connections and add fsid=0 to make this your root. Then you can follow the documentation without changes from here onwards.
To setup the NFS server itself run the <path-to>/microservices_connections/hybridcloud/support/nfsSetup.sh script.
Finally to setup the Connections volumes you need to perform on the Kubernetes Master:
helm install --name=connections-volumes /mnt/connections-data/install/microservices_connections/hybridcloud/helmbuilds/connections-persistent-storage-nfs-0.1.0.tgz --set nfs.server=YourNFSServer.example.com,persistentVolumePath=/pv-connectionsRegarding the options I use above:
- nfs.server= <= the dns name or IP address of your NFS server goes here
- persistentVolumePath= <= if your NFS share has a different root than /pv-connections, this is the place to state that for all parts of the component pack except Activities Plus
I urge you to check the HCL documentation for the other options.
You can check if everything went fine (so far) by kctl get pv and kctl get pvc
Reserve (a) specific node(s) for Elasticsearch
HCL advises to use specific worker nodes for Elasticsearch. To do this, you need to ‘taint’ the nodes using these commands.
kubectl label nodes <elasticsearch-node> type=infrastructure --overwrite
kubectl taint nodes <elasticsearch-node> dedicated=infrastructure:NoSchedule --overwrite
You can lookup your node names with ‘kubectl get nodes’
Implement pod security policies
If you want to use pod security policies, use the command below. Check the HCL documentation on how to check if it’s properly implemented.
helm install --name=k8s-psp <path-to>/microservices_connections/hybridcloud/helmbuilds/k8s-psp-0.1.0-20200131-192818.tgzBootstrap the Kubernetes environment
Bootstrapping a Kubernetes cluster performs the following tasks:
- Checks the Kubernetes version
- Creates the required Kubernetes secrets
- Creates the required IBM Connections certificates
- Configures Redis for use by the Orient Me component
Check the HCL documentation for all different options. I used the following command:
helm install --name=bootstrap <path-to>/microservices_connections/hybridcloud/helmbuilds/bootstrap-0.1.0-20200319-174729.tgz --set image.repository=<my-Docker-registry:5000>/connections,env.set_ic_admin_user=<connections-admin>,env.set_ic_admin_password=<connections-admin-password>,env.set_ic_internal=connections.example.com,env.set_master_ip=<ip address of Kubernetes master>,env.set_elasticsearch_ca_password=<password1>,env.set_elasticsearch_key_password=<password1>,env.set_redis_secret=<password2>,env.set_search_secret=<password2>,env.set_solr_secret=<password2>,env.set_starter_stack_list="customizer elasticsearch orientme"‘connections-admin’ being your Connections admin user for the WebSphere stack. usually either wasadmin or an admin user in your LDAP repository. I saw no need to use all different passwords for all the secrets. I used one for the elasticsearch secrets and one for the rest. Check the HCL documentation on how to check if everything went right.
Installing the Component Pack’s connections-env
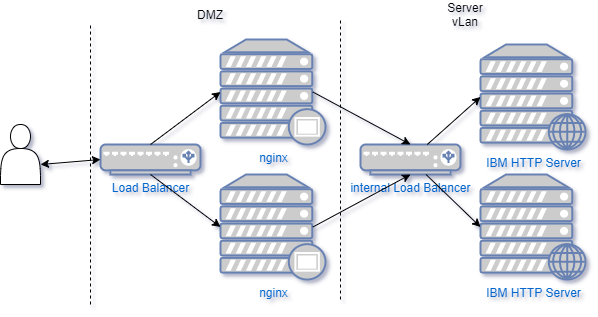
Again here, the HCL documentation is decent, so check that out. For this part it’s important to be well aware of your web server infrastructure for Connections. If you use customizer it’s obligatory to use a reverse proxy (nginx is advised) in front of your IBM HTTP server. In large environments it’s likely you use multiple of those with a load balancer in front. If you have a setup like below, you have a Load Balancer that is used by your users and an internal load balancer for the internal server processes. In this case your ic.host is your front-end load balancer and ic.internal is your internal load balancer. In simpler setups, ic.host and ic.internal can also point to the same address, which means all traffic will flow past your reverse proxy.
This setup will define how to choose your options in the Helm command. In my current setup I have one nginx server and one ihs server. That leads to this Helm command:
helm install --name=connections-env <path-to>/microservices_connections/hybridcloud/helmbuilds/connections-env-0.1.40-20200320-143558.tgz --set onPrem=true,createSecret=false,ic.host=connections.example.com,ic.internal=con-ihs01.example.com,ic.interserviceOpengraphPort=443,ic.interserviceConnectionsPort=443,ic.interserviceScheme=httpsInstalling the Component Pack infrastructure
The infrastructure Helm chart will install the first pods, the pods that are used by multiple applications, like Orient Me, Customizer and Activities Plus. The following components are deployed as part of the infrastructure:
- appregistry-client
- appregistry-service
- haproxy
- mongoDB
- redis
- redis-sentinel
Follow the HCL documentation at this point to see what your Helm command should look like and how to check if Redis installed correctly. My Helm command was:
helm install --name=infrastructure <path-to>/microservices_connections/hybridcloud/helmbuilds/infrastructure-0.1.0-20200321-173948.tgz --set global.onPrem=true,global.image.repository=<my-docker-registry:5000>/connections,mongodb.createSecret=false,appregistry-service.deploymentType=hybrid_cloudThis is the moment to find out if everything in your infrastructure is configured correctly and working as it should. Check if all pods come up. kctl get pods gives you a list of all pods that are deployed so far. If pods have the status “Pending”, “ContainerCreating” or “Initializing”, you have to wait a bit longer. If all pods (except the Bootstrap pod which should just have the status “Completed”) have the status “Running” you’re good to go. If, however, you get statusses like “ImagePullBackoff”, “ErrImagePull” or “Failed”, it’s time to start troubleshooting. Some commands to help you:
kctl logs <containername> gives the logs of the particular pods. If there’s more than one container you need give the containername along, for example kctl logs mongo-0 mongo
kctl get events --sort-by='.metadata.creationTimestamp'| grep <e.g. mongo> shows all events for this particular service in order of creation. This will give you information on why a certain pod can’t be created.
kctl describe pod <podname minus the tag> can also give you a lot of useful info on why a pod won’t work as you wished.
The problems I ran into when deploying the infrastructure chart were:
- My demo environment complained about a missing Mongo secret.
kctl get secretslets you investigate which secrets you currently have. If indeed your mongo-secret is missing, remove the infrastructure helm chart (helm del --purge infrastructure) and rerun it withmongodb.createSecret=true - The company where I was implementing the Component pack was using an SSL inspector for outgoing connections from their servers. That means that your connection will end at the SSL inspector which will present its SSL certificate. The SSL inspector will grab the info from the actual website you tried to reach, but what your client will see is information from website A with a SSL certificate from website B. Docker doesn’t like that. Some images need to be pulled from k8s.gcr.io. This is a site that will redirect to a mirror, so whitelisting this website won’t do the trick either. I only got past this by having the entire Kubernetes cluster whitelisted from the SSL inspector.
- Problems with the NFS share and Mongo DB. Mongo is very picky when it comes to the NFS share. Your NFS share which works for all WebSphere components won’t necesarily work for Mongo. We’re still trying to get the NFS share on a EMC Isilon to match the needs of MongoDB. In the mean time, the workaround has been to deploy a separate NFS server based on Linux. The errors I was running into with Mongo were:
E STORAGE [initandlisten] WiredTiger error (17) [1592911479:795308][1:0x7f822c5d9970], connection: /data/db/WiredTiger.wt: handle-open: open: File exists
E STORAGE [initandlisten] WiredTiger error (1) [1592911479:880483][1:0x7f822c5d9970], connection: /data/db/WiredTiger.wt: handle-open: open: Operation not permitted
E – [initandlisten] Assertion: 28595:1: Operation not permitted src/mongo/db/storage/wiredtiger/wiredtiger_kv_engine.cpp 421
Update
We found what the problem with Mongo and the Isilon was. Isilon uses a system user which has uid 1001. This is the exact same system user that the Mongo container uses and this clashes. We realised this when manually trying to do the same actions that the mongo container does e.g. chown all files to a user ID, then try to change a file. This worked fine with any ID but 1001. With uid 1001 we weren’t able to change the file. This is not a component pack thing btw. If you use Mongo with Kubernetes, it will use uid 1001. So if you want to use a Dell/EMC Isilon with Mongo, you will have to reconfigure this system user on the Isilon.
The AppRegistry needs Mongo, so if your Mongo pods aren’t running successfully, there’s no need to look at your AppRegistry containers.
If something went wrong in your helm commands and you need to redo them, you have to rewind. With ‘rewind’ I mean that you have to purge the helm charts in reverse order of how you created them, so if you need to redo your connections-volumes rollout, your ‘rewind’ commands would be:
helm del --purge infrastructure
helm del --purge connections-env
helm del --purge bootstrap
helm del --purge connections-volumes
From there you can reinstall the helm charts starting from the top of blog post.
If all pods (except Bootstrap) have the status “Running”, you’re ready to start deploying the actual applications in the Component pack, which I’ll discuss in the next part of this series.
References
HCL documentation – Bootstrapping
HCL documentation – Connections env
HCL documentation – Infrastructure

Well done; very helpful. Far more so than the online docs. Waiting for part 5!