
Making this blog reachable over IPv6
The past week, I looked at making this blog available over IPv6. Regretfully, this led to an outage that I wasn’t aware of as from my home everything was working just fine. To make up for the outage, I’ll describe what I did to make this blog reachable over IPv6.
1 – Get an ISP that provides me with an IPv6 address
This blog is not hosted at a hosting provider, but is actually hosted at my home server. That makes things like adding an IPv6 address actually a bit more complicated, but also more fun. For me, I couldn’t just switch from ISP as my ISP (Ziggo) used to be the only provider that gave me proper internet speed here at my home. And they were very slow with providing IPv6, but 1 1/2 years ago, I suddenly realised that they changed something and gave me dual stack IPv6 (meaning I have both a proper IPv4 and an IPv6 address). I then still had to put my internet modem in bridge mode to get my IP addresses on my router. That way, I can quite reliably distribute my IP addresses on my home network.
2 – Enable IPv6 on the server
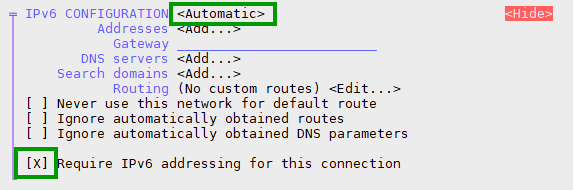
My server is running on CentOS 9 Stream. CentOS 9, by default, uses Networkmanager for its network configuration. To enable IPv6 on your server, it’s probably enough to set you IPv6 interface to automatic and make sure that IPv6 is required for the connection. The latter means that NetworkManager will make sure that your server will have both an IPv4 and an IPv6 network address. If you don’t ‘require’ IPv6, it might feel that the IPv4 connection is enough and not wait for the IPv6 connection to come up. The result will be that your network interface will not have an IPv6 address assigned to it.
You can configure this, using nmtui.
If you check your IP address now using ip a | grep inet6, you might see several IPv6 addresses. The way to see at which IPv6 address your server is available is through this elegant command:dig -6 TXT +short o-o.myaddr.l.google.com @ns1.google.com
Btw, there’s also a IPv4 variant:dig +short txt ch whoami.cloudflare @1.0.0.1
3 – Listen for IPv6 on the webserver
I use nginx as a reverse proxy for this blog. In nginx, you have to make sure that every listen line is accompanied by a listen line for the IPv6 address. Like this:
server {
        listen      443 ssl http2;
        listen [::]:443 ssl http2;
        server_name blog.martdj.nl;
The IPv6 line is the “listen [::]:443 ssl http2;’ line. Don’t forget to reload your nginx configuration when you’re done.
4 – Check the firewall of the server
If you allow port 443, it should also allow this for IPv6, but it’s good to check if everything is working so far. A good way to do this is by using openssl to check the TLS certificate through both IPv4 and IPv6.
openssl s_client -servername blog.martdj.nl -showcerts -connect <server's IPv4 address>:443
openssl s_client -servername blog.martdj.nl -showcerts -connect [<server's ipv6-address>]:443
If the firewall is open, you should get the same response on both commands: The certificate chain of your TLS certificate.
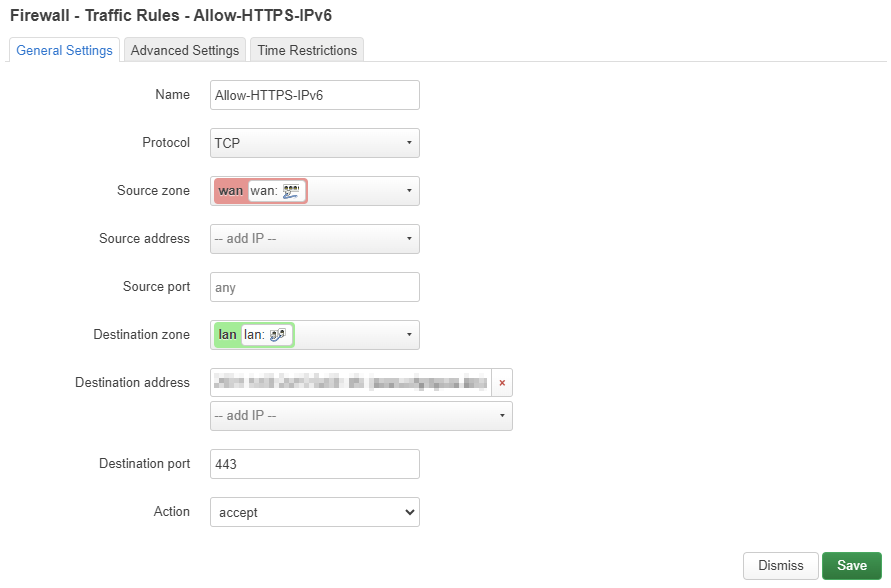
5 – Create a rule on the router
Although you don’t need to do any port forwards (there shouldn’t be NAT with IPv6), on most routers you’ll have to tell your router that you want to allow IPv6 traffic for a certain port and IPv6 address to be passed on to this address. You do this with a firewall rule. I use a router with an openWRT firmware. There, the firewall rule (in /etc/config/firewall) looks like this:
config rule
        option name 'Allow-HTTPS-IPv6'
        option src 'wan'
        option dest 'lan'
        option proto 'tcp'
        option dest_port '443'
        option family 'ipv6'
        option target 'ACCEPT'
        list dest_ip '<my IPv6-address>'
In the interface, this looks like this:
If this was successful, the openssl-command from step 5 should also work from a server on the internet.
6 – Add the IPv6 address to your DNS
When you made it this far, all you have left to do is to add the IPv6 address to your domain’s DNS. One important thing to watch out for (and the reason of this site’s outage): If you use a wildcard A-record to send all traffic to a specific IPv4 address, but you create an AAAA-record (Ipv6) for a specific site (like blog.martdj.nl), your IPv4 wildcard will no longer cover blog.martdj.nl! As a result, your site will only be available over IPv6. It’s therefore important to either create a wildcard A-record and AAAA-record or create an A-record and AAAA-record for your site.
7 – Test your site
You can check if your site is available over both IPv4 and IPv6 through this website. As you can see below, this blog is now available over both protocols.

Conclusion
The rule on the router and the way to add the IPv6 address to my DNS were the biggest hurdles for me to make this site available over IPv6. While implementing it, I did think of other things I could change or automate to my own environment regarding IPv6. For example, my Domino server isn’t available over IPv6 yet. Also, the dig-rules I described, create an opportunity to automatically update my DNS if my ISP decides to change my IPv4 address and/or IPv6 prefix. Those go on my to-do list and might be a subject for future articles.

When did this topic start becoming relevant as explained in Making this blog reachable over IPv6?
In Europe and the US IPv6 is still not relevant, I guess, as there are still enough IPv4 addresses. Currently, Asian countries are the main places where people might go online on IPv6 only connections.
As there’s no downside to have this blog available to both IPv4 and IPv6, it is best to have both.